Sunday 3 January 2016

Financial Functions: Applying Black & Scholes Model in Excel

The Black & Scholes model is widely applied in finance especially to price options on the equity markets. This pricing model assumes the following:
  • An interest rate compounded continuously that will be noted as r.
  • Geometric Brownian motion dynamics for equity price that will be noted with St
  • The equity is paying a dividend noted with c.
  • The maturity and the strike are noted with T and K respectively.
The formula for the Black & Scholes pricing model for an European call option is:
Given the put-call parity between the options' prices, the formula for the European put option is:
To apply these formulae in Excel, do the following:
  1. Specify the option's parameters: the spot price of the underlying security, the maturity of the option, the dividend yield of the underlying and its volatility, the rate of the option and its strike.
  2. Input the formulae for the two discount factors as follows:
  3. For the first discount factor, add the displayed in this screenshot, adjusted to your spreadsheet: 

    For the second discount factor, input the formula used in the next screenshot:

    You can now calculate the price of the option.
  4. Input the formula shown in the following figure: 
Note that for the parameters of my instrument, the resulting price of a call option is 14.63. To calculate the price of the put option, use the put-call parity formula:
That's about it! You now know how to use this pricing model in an Excel spreadsheet. If you have any questions, don't hesitate to contact me by writing a comment on this page.
See you at the next tutorial!

PS: For more quality content, visit https://bitheap.tech.


Saturday 22 August 2015

Financial Functions: Calculating the Yield-to-Maturity Indicator in Excel

Overview

The yield-to-maturity (YTM) is an indicator specific to bonds, that is used to measure the rate of return of a bond, if the instrument will be held until its maturity date.
This indicator takes into account the market value, the coupon value, the remaining time until maturity, face value and the coupon payment frequency of the bond. The calculation formula for this indicator is considered to be the most accurate method for anticipating the bonds' return, therefore it is important for every financial analyst to know how to apply the formula in an electronic spreadsheet.

Calculating YTM

To start calculating the YTM of a bond instrument, you need to set up your spreadsheet. First, you need to allocate five cells of your sheet for writing the names of the elements for the formula. You can organize your sheet as follows:
  • On the first cell type Face Value, and write the value below the cell. 
  • On the second cell type Coupon Rate, and write the value below the cell. Note that the rate must be annualized and expressed in percentage.
  • On the third cell type Remaining Maturity, and write the remaining time until maturity below cell. Note that the value must be in years. 
  • On the fourth cell type Payment Frequency, and write the value below the cell. Note that the frequency must be expressed in coupon payments per year. 
  • On the last cell type Market Value, and write the value below the cell. To correctly valuate a bond instrument, you need to determine the present value of the cash flows generated by the bond. Once you calculate these, add them and you will get the value of the bond. 
Let's assume an example of a bond instrument with the following parameters:
  • The face value is 1000$
  • The coupon rate is 7%
  • There are four remaining years until the bond reaches maturity
  • The bond issuer is paying twice a year.  
  • The market value is 950$
The Excel function used for determining the YTM of the bond is RATE. To compute the YTM, follow the steps below:
  1. Click outside of the table array.
  2. Clickto display the Insert Function dialog box.
  3. Select RATE function and click OK. The Function Arguments window will be displayed.
  4. On the Nper field, multiply the number of years until maturity with the payment frequency value.
  5. On the Pmt field, divide the coupon rate with the payment frequency and multiply with the face value. 
  6. On the Pv field, write the negative market value. In our example, -950 will be written on this field. 
  7. On the Fv field, specify the cell that contains the face value. 
  8. Press Enter and multiply the formula with the payment frequency. 
The formula should look like in the following screenshot:

The rate of return for the bond, if it is held until maturity, will be 9%. 
Thanks for watching this tutorial! Feel free to post a comment if you have any feedback or tutorials suggestions. 

Sunday 16 August 2015

Using VLOOKUP and INDEX Functions in MS Excel

In this tutorial I will explain the basic differences between VLOOKUP and INDEX functions in Excel, highlighting the strengths and weaknesses of each function.
The VLOOKUP function helps you to find data related to other information in a table's columns. Additionally, if you want to perform the same function horizontally, at the row level, you can use HLOOKUP.
The INDEX function returns the relevant data from a given range. It's basically doing the same thing but there are important differences that makes INDEX the preferred function instead of the lookup function category.
The syntax of the VLOOKUP function is the following:
  • lookup_value — This parameter represents the value that you want to look up. The parameter is required to generate valid results, otherwise, the function will not work. This value must be in the first column of the range of cells selected for the table_array parameter.
  • table_array — This parameter contains the range of cells in which the function will seek for the value inputted for the lookup_value parameter. 
  • col_index_num — This parameter contains the number of the column, starting with 1 for the left-most column of the table. The selected column must contain the return value. 
  • range_lookup — This parameter is option and have the role to force the function to look for an exact or an approximate match  of the lookup value, in the selected array. The parameter supports logical values such as TRUE or FALSE, and by default the TRUE value is selected.
Let's assume that we have the following set of data:
Supposing that I want to display the total amount sold on 10/14/15. To perform the VLOOKUP function, do the following:
  1. Click outside of the table array.
  2. Clickto display the Insert Function dialog box.
  3. Select VLOOKUP function and click OK. The Function Arguments window will be displayed.
  4. On the Lookup_Value field, write the date that we are looking for, that is 10/14/15.
  5. On the Table_array field, select the table array. 
  6. On the Col_index_num field, select the number of the column where the total amount is stored. 
  7. On the Range_lookup field, select False to search for an exact match.
The result should look like in the following screenshot:
The issue with this function is that if you choose to move your table, including the data used by the function, the function will return a non-value. 
The index function has a simpler syntax, and can contain both VLOOKUP and HLOOKUP in just one function. The following parameters can be configured for INDEX function:
  • array — This parameter contains the range of cells where the data can be found. If the array contains only one row, or column, that specific parameter, correspondent to the row or column, is optional. If the table contains more than one column or row, and only one parameter is used, depending if you want to return a value from either a column or a row, the function will return an range of the entire row or column in array.  
  • Row_num — This optional parameter selects the row in array from which the value must be returned. If you don't use this parameter, the Column_num parameter is mandatory.
  • Column_num — This optional parameter selects the column in array from which the value must be returned. If this parameter is not used, the Row_num parameter is mandatory.
Let's suppose that I want to display the total sales of the East region registered on 4/1/2014. To do this, follow the next steps:
  • Click outside of the table array.
    1. Clickto display the Insert Function dialog box.
    2. Select INDEX function and click OK. The Function Arguments window will be displayed.
    3. On the Array field, select the entire table. 
    4. On the Row_num field select the number of the row that corresponds to our criteria (East region and 4/1/2014). The number of the row is 7.
    5. On the Column_num field select the column correspondent to the total sales, that is 7.
    6. Click OK and check the results.
    Thank you for viewing this tutorial. If you have suggestions of other tutorials related to other applications, don't hesitate to post a comment.

    Saturday 20 June 2015

    Create Custom Functions in Excel

    In this tutorial I'm going to show how to create a custom function in MS Excel. The formula we are going to create is the body mass index that measures whether a person is overweight, has a healthy weight or needs to gain some kilograms.

    To stat developing a new formula in Excel, open the application and press Alt + F11 if you're using a Windows system. If you're using Mac, press Fn + Option + F11. This action opens the Visual Basic Editor, that allows you to extend the functionality of the application. 

    Next, after displaying the Visual Basic Editor window, click Insert drop-down menu and select Module, like it is shown in the following screenshot:


    Next, you need to insert the following syntax in the newly displayed window:
    Function <Name of function>(Parameter1, Parameter2)

    Firstly, you write Function and then you need insert the name of the function. Note that you don't need to put the comparing symbols. I put them to show you that what's there requires your input. Secondly, in the parenthesis, you need to write the inputs of your function. In our case, the inputs will be Height and Weight

    After you press Enter, notice that the End of the Function argument is automatically placed at the end of the custom function.
    Next, you need write the function's formula, so in our case, the result will be the following:
    <Name of function> = (Weight)/(Height * Height)
    The final function should look like the following:

    Function BodyMassIndex(Weight, Height)
    BodyMassIndex = (Weight) / (Height * Height)
    End Function

    Save your result and go to your spreadsheet to test the newly created function. 

    Click on the Fx button to open the Insert Function dialog box. Select All on the Or select a category drop-down menu, and search for the new function. Select it, and click OK. You will be prompted to input your weight and height. After completing this step, click OK and notice that the result is generated.

    If you're using the imperial system, note that the result from the division between Weight (in lbs) and Height (in inches) should be multiplied with 703 to get the final result. 

    I hope this tutorial improved your knowledge in creating custom functions in Excel. Please submit your feedback by posting a comment below. 

    See you at the next tutorial!

    Saturday 14 February 2015

    Creating Data Graphs in Microsoft Excel

    How To Create Data Graphs in Microsoft Excel

    This tutorial shows how to create a complex data graph in MS Excel 2010, using data from your excel spreadsheet. After you complete your graph, MS Excel allows you to copy your work to every MS Office product, including MS Word or PowerPoint which is useful if you want to present a chart made in Excel.

    Selecting Data For Your Graph

    The first step that you'll need to undertake is to select your source data for your graph. If you wish to design a graph based on the data from a single table, it is enough to select only a cell from that table, but if you wish to create a graph using certain rows or columns from the data table, then you'll need to select those areas.

    Choosing the Graph Type

    After you've selected the data for your future graph, it's time to select your graph type. To view the available types of graph in MS Excel 2010 version or above, just click on the Insert ribbon tab.
    You'll see that a section called "Charts" is displayed. That section contains the graph types.


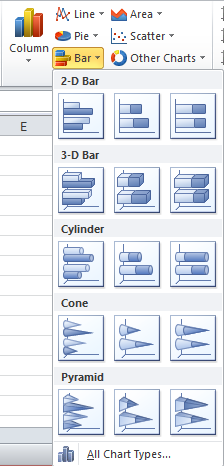
    Every graph type contains several subtypes. To view the whole gallery of a graph type, for example Bar charts, click on Bar button.
    Additionally, you can click All Chart Types to view the gallery of every graph category.


    The screenshot below illustrate an example on how the graph is generated. In this example, the graph displays who bought the items of a store, using a pie chart.
    Once you've created the chart, notice that additional tabs appeared on the ribbon.
    The first one, the Design tab, allows you to change the design of your chart, as well as changing the type of the chart. Also, the Select Data option is displayed here, which allows you to insert the data series manually in order to generate a graph.

    Changing Rows and Columns

    Let's presume that we have the following table that we want to transform into a graph:

    The above table displays the average wages for New York and Los Angeles. Let's assume that you want to create a column type , bidimensional graph. Just click within the table, and go to Insert > Column and choose a 2-D column graph. The result looks like the following figure:

    This view displays the average wage for every city on each of the three years. To display the average wage drilled down on years for each of the two cities, click on the graph, choose the Design ribbon tab, and click Switch Row/Column. After this, you should have the following result:

    Note: If the table is taking into account the first cell of the header row from your table, in this case, the "City" cell, it means that you just wrote on the cells without creating a table. To have the graph generated properly, you should create a table first.

    Choosing the Layout of the Graph

    The layout of the graph allows you to change elements such as Title, Legend, Axes or Gridlines. If you want to experiment with different layouts for your graph, click your graph to enable the Chart Tools section on the ribbon. Next, click on Layout to view the available options for editing the graph layout. For example, if you want to add titles to your axes, click the Axis Title button, and choose the axis that you want to hold the title.
    If you wish to change the style of the graph, meaning that you want to change the design of the columns, go to the Design tab, and click arrow on the Chart Styles section. A gallery of styles is displayed:

    Moving the Graph on a Different Sheet

    You have the possibility to move your graph if you don't wish to display the data and the graph on the same sheet. To do that, follow the steps below:
    1. Click on your graph and choose MoveChart from the Design tab.
    2. Notice that a dialog box pops out. On this dialog box, select Object In button, and choose the sheet where you want to move your graph.

    Advanced Chart Formatting

    Creating a basic graph involves choosing your data for visual representation, choosing the type of graph and also choosing the design details of the graph. Excel enables you to opt for additional options for customizing your graph. For example, if you want to choose another color for one of chart's columns, presuming that you have a column type chart on your sheet, click on the column and then select the Format tab on the ribbon.
    Notice that you can change the column color by selecting a new color from the Shape Fill menu, or you can outline the graph column by choosing an option from the Shape Outline menu. To view all the objects of your graph, on the Format tab, click the drop-down arrow from the left side of the ribbon:
    After you've selected the element that you want to modify, click Format Selection and choose the modifications that you want to perform. For example, you can choose a thicker line for representing one of the graph axis. To do this, choose one of the axis on the graph element drop-down list (the one from the screenshot above). After you've selected the axis, click Format Selection, and go to the Line Style menu. Here, you can choose how the line should look like, by choosing its width or its type (dash, compound etc.). 
    Moreover, you can adjust the graph elements using your mouse. 

    Editing the Axes

    To change the numbers displayed on your axes, choose the axis element on the graph element drop-down list (the one from the above screenshot), and select Format Selection. On the first menu, choose the Minimum or the Maximum value represented on the axis, as well as other options like axis labels. 
    Notice that for the 2-D graphs, there are only two axis represented on the graph element drop-down list. The tridimensional graphs have a third axis, known as "depth axis". 

    Formatting the Data Series

    MS Excel allows you to assign the secondary axis to a data series. This is required if the data series cannot be represented using the same type of data. To introduce the secondary axis, you need to select the axis that you want to transform into a secondary axis. After that, click Format Selection on the Format tab, and notice that the Series Option menu is displayed. On this menu, select whether or not the selected data series should be treated as primary or secondary axis. Beside this, you can select if the columns should be displayed separately or overlapped. 

    Adding a Tendency Line

    Tendency lines, also known as trendlines, are used to predict the behaviour of a certain data type. These lines are used especially for developing Pareto charts. To add a trendline, right-click a data series, and choose Add Trendline from the context menu. The following window is displayed.
    Here you can choose the type of the trendline. Furthermore, you can edit the way the trendline is projected by defining the forecast points. 

    Example: Creating a Combination Chart

    This example shows how to create a combination chart using the tips covered by this tutorial. You can try to create your own combination chart, or you can follow the steps listed below. 
    So let's suppose that you own a book company, and you want to see how the sales evolved after you implemented a new distribution system for decreasing the time of delivering the books to the clients. 
    First, you need to define the data in a table, like the one displayed below: 
    The next step would be to highlight the newly created table, click Insert ribbon tab, click on Line drop-down list to view the available line charts, and then select Line with Markers
    Notice that a line chart is generated. To increase the visibility of the Distribution Time line, double click the Primary Axis (Sales line) and switch it to the Secondary Axis. The following figure shows how the line graph should look like. 
    Next, you need to select the red line (Sales line), click Insert ribbon tab, click on Column drop-down list, and choose the Clustered Column type of chart.
    The combination chart is now created! It is now visible that the distribution time had a considerable impact on the sales process. The following screenshot shows the final chart:

    Hope that this tutorial helped you to gather proper understanding on how to use graphs/charts in Excel. If you have any questions, don't hesitate to contact me. 
    See you at the next tutorial!

    Sunday 8 February 2015

    Excel Tutorial: PMT Function

    On this tutorial I am going to show you how to use the PMT (Payment) function of Excel. PMT function is a financial function that is used to calculate the value of periodic payments for an investment or a bank loan.
    To find this function in Excel, you just need to click Formulas ribbon tab, click the Financial button, and choose PMT from the drop-down list.
    Note that there are a few arguments for this function, that will be explained in the following section.

    The Arguments of the Function

    The following arguments appear on the right side of the function name, in parenthesis:
    • rate
    • nper
    • pv
    • [fv]
    • [type]
    The following table describes every argument of this function:
    Argument
    Description
    Rate
    Describes the interest rate of the investment/loan.
    Nper
    Describes the total number of payments for the investment/loan.
    Pv
    Describes the present value, or the amount that a series of future payments values now.
    Fv
    Describes the future value that remains after performing the last payment. This argument is optional, and if it is left blank, will be considered zero.
    Type
    This argument needs to be set to zero if the payment is executed at the end of each period or one if the payment is done at the beginning of each period. This argument is optional.

    Using the PMT Function

    Let's imagine that you want to invest a constant amount of money every year in a deposit with an interest rate of 12% per year. After 10 years, you want to get the final amount of 80.000 US dollars. 
    How much money you need to invest?
    To find out the solution, write a small table in excel like the one from the following screenshot:


    Before submitting the values for arguments, select the B4 cell to spawn the PMT function result on that cell. Next, open the PMT function and choose the following values for the function's arguments:
    • For Rate choose B1.
    • For Nper choose B2.
    • For PV choose zero because the beginning value is equal to zero.
    • For Fv choose B3, because you want to attain that amount of money.
    • Leave the Type argument undefined. 
    The result will be -$4.558,73, meaning that you need to invest that amount of money to get 80.000 $ after 10 years with 12% annual interest rate. Quite a lot of money, isn't it?
    Let's take a look at the following scenarios:
    How much money do you need to invest, if the interest rate is applied at every six months?

    • For Rate choose B1 divided by two, due to the fact that the interest rate is calculated at every six months.
    • For Nper choose B2 multiplied by two, because the number of payments has been doubled. 
    • For PV choose zero.
    • For FV choose B3.
    The result will be -2.174,76 US dollars. 
    How much money do you need to invest, if the interest rate is calculated on a monthly basis?
    • For Rate choose B1 divided by 12.
    • For Nper choose B2 multiplied by 12. 
    • For PV choose zero.
    • For FV choose B3.
    The result will be -347.77 US dollars. 
    After you performed the calculations for each scenario, you should have a spreadsheet similar with the one provided below:


    That's it for today's tutorial. If you have any questions, don't hesitate to contact me and I'll answer you as soon as possible. Also, don't forget to send me your feedback with what should be improved for the future tutorials :).

    Monday 2 February 2015

    Welcome to my blog!

    Blog Overview

    I'm here to teach you how to use top applications for performing different tasks, such as photo manipulation, web development, word processing and database maintenance.
    This blog contains written and video tutorials, that aim to enhance your knowledge on using software applications for carrying out specific tasks. Moreover, I provide a section with reviews for topics within technology field.

    Be more productive!

    Begin your journey for becoming a more productive person. Lifehacks, personal development courses, and tips from successful people, are also presented on this blog, with the main purpose of increasing your skills and leveraging your potential.

    Send me your feedback!

    The blog is continuously improving for providing quality content for you, but your input is needed in order to reach the highest standards. Provide your feedback on what needs to be continued, and what has to be improved, and I'll seek to respond to your requests. Meanwhile, enjoy the time spent here, and make sure you added this blog to your browser's bookmark list :).